
I've always thought that the fact that I usually can't afford to indulge in a buying frenzy to acquire the latest and coolest finding/gemstone/chain/doo-dah out in the marketplace has definitely made me the “Mother of Invention”. It's made me dig a lot deeper into whatever I was working on, to find solutions that don't require a large cash expenditure.
On this blog and others, discussion has been raging lately about what entails copying vs. interpretation. When does a piece become your own and when is it merely a rearrangement of a few minor elements, not really a true embodiment of your own creativity? I don't have all the answers, by any means, but here's something that I do in my own pieces that might be useful as a jumping-off point.
Combine the techniques of different artists. I just completed a necklace using my beads and the beads of two other polymer artists (see my previous blog post, Copycats). I really loved the look of the piece and resolved to explore for myself in some new work the techniques used by my collaborators.
Rebecca Watkins, Artybecca, has a very unique carving technique which she generously shared on her Flickr site. I had bought some Dockyard micro-carvers last year which I had yet to use, which work better on small pieces than standard linoleum block carving blades. I mixed up some of my special formula ivory polymer (special only because it has the proportions of translucent, ecru and white Premo clay that I like), played with shapes, formed and cured the batch of five beads.
Getting the hang of carving can be tricky. I now have a few little nicks in my fingers, which will definitely happen if you hold your pieces in your hands while you carve. My husband got tired of hearing me yelp and made me a little jig that locks onto the edge of my desktop to keep the pieces from sliding around. But I just went slowly and not too deeply, following lines I marked on the pieces in soft pencil first. I kept it kind of primitive but kept working into them. Since the beads were not flat in any sense of the word, this took some time in order to not gouge my fingers any further. I found it very meditative.
Now the carving was done but they needed some definition and color. Claire Maunsell is a superb colorist and has inspired me ever since I first saw her work on Polymer Clay Daily. She cleverly lays down layers of pigment until she reaches her final color destination. I started with the traditional raw umber paint to define the carving, dabbing the acrylic into the cuts liberally with a paintbrush and lettting the beads sit for a few minutes before wiping most of the paint off with a paper towel. Sometimes I just cure the beads to set the paint and then sand, but these beads were curvy and uneven and wiping was my preferred method.
Now to add some real color! I wanted to coordinate the bead color with the patination I was going to apply on the wire-wrapped elements which would pull the whole design together. I also was using coral chips I had just purchased that were a rinsed red color. This was going to be a lighter color palette than my usual one-- more of an aurora sunrise with patina green touches. I decided to use a dry-brush technique to lay on the acrylic paint that I learned from furniture painter and master craftswoman, Ruth Pope. You use a small fan brush, one that's made from synthetic fibers and fairly stiff. Dip the tips of the brush in your your first color, then brush the excess off on a piece of paper towel. You have just a little color left and it's fairly dry. Now you can brush very gently in a back and forth wrist motion over the area you want to color. It lays down very little pigment on each pass so you can go back and add more if you want. It's almost like you're buffing the surface with the brush. Layers of color enhance one another and create a totally different effect from blending them all together into opacity, which could result in the color of mud! With this dry brush technique, what you have are layers of transparent color, one over another and the base clay color comes through in some places as well.


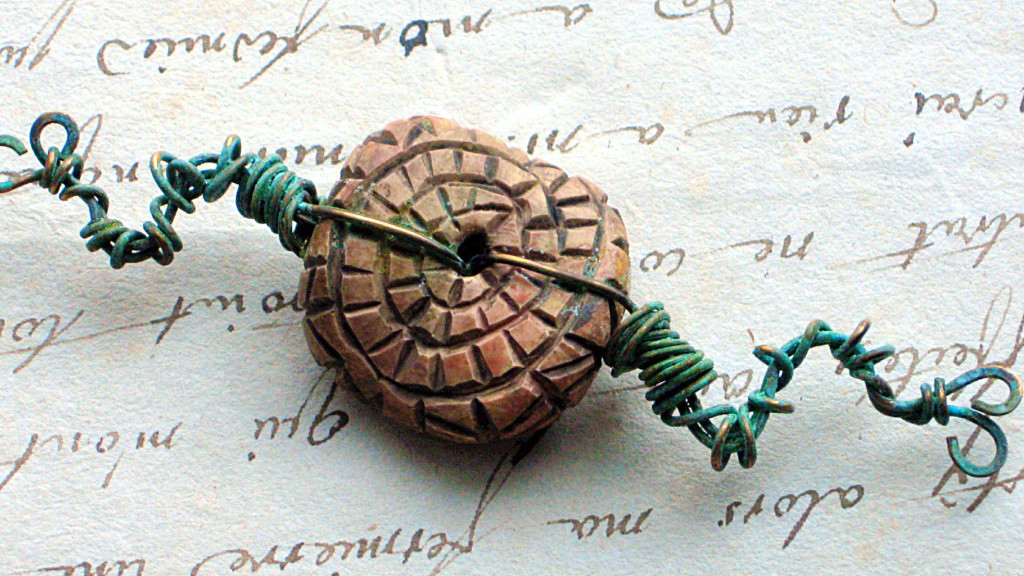

Patinated green chain and element from Missficklemedia.etsy.com
I'm not finished with the necklace yet but I'm very happy with what I've done so far. I also discovered that you can patinate the wirework after you've already threaded it through the polymer bead. Avoid getting too much of any patina solution on the clay or you'll have to use a commercial alcohol ink remover to take it off. For the green patina, I simply applied the patina solution I purchased from Missficklemedia with a brush in multiple applications until it was the color and coverage I wanted. Shannon LeVart has an excellent tutorial on patination, as well as supplies, for sale on the MissFickle Etsy site that I used for these pieces.
Stay tuned for more texture and antiquing experiments-- I've discovered an interesting new direction for me, courtesy of my friends Claire and Rebecca.
My sisters, Creativity and Ingenuity, must be partying over at your place right now. That is INSPIRED creating. I love that you are pulling all these techniques together. You are really evolving and growing as an artist. Thank you so much for sharing this wonder-filled journey with us. Enjoy the day!
ReplyDeleteErin
This is nothing short of breathtaking. Seeing things like this make me sit back and just look, to take it all in, and realize it's not just beads and wire. It's thought and art.
ReplyDeleteAfter seeing an artist create amazing works with nothing but crayons, I vowed to never say to myself "I don't have what I need to create what I want". I really, really, really, believe that I got to the point where I am today in my creative journey by experimenting with what I already had.
ReplyDeleteI love this piece so very much, Christine! It is wonderful!
The beads are awesome, love the transparent colour layers and the texture. Can't wait to see where this piece goes. Love the curly-whirly wire connection!
ReplyDeleteChristine, save your hands and fingers from the blades! Carve before baking to avoid bloodshed!
ReplyDeleteWhat a wonderful post! I use that dry brush technique too - needs a lot of patience.
ReplyDeleteBeautiful beads...it's also interesting to watch us treading the same path with different results.