Thursday, October 4, 2012

Soaring – ArtBliss 2012


Teaching has to be the scariest and, at the same time, most exhilarating thing you can do as a human. You just have to fling yourself out there, be as authentic as possible and pray that your students are not only getting it but enjoying it. Bold is the way to go, no other way. What could be more terrifying than to look up at a ring of faces to see a look of total incomprehension on them all. But to look up and see everyone nodding and smiling-- ah, bliss! Soaring!

My three days at ArtBliss 2012 in Sterling, Virginia were a non-stop whirlwind-- meeting people, taking in all the creativity of the assembled students and teachers, connecting with friends both old and new, putting every ounce of energy into making sure my students were inspired, motivated and successful. Cindy Wimmer and Jeanette Blix made sure that nobody was bored or hungry or uninspired-- there was so much to do that I didn't get to enjoy simply because I needed to recharge every night so that I could make sure my students go their money's worth. They organized bead and charm swaps, coordinated author signings, provided great food and encouraged camaraderie.

Heartfelt thanks to all my fabulous students for conquering your fears about trying new things! Everyone seemed to trust themselves to delve deep into their creative wells and produced amazing work while supporting each other to expand and learn. What a nurturing environment!

As usual, I didn't get all the photos I wanted to but thanks to the camera skills of several students, including Carol Myers and Kathleen Klik, as well as those of Cindy and my husband Douglas, I think I managed to gather enough images to give you a hint of the level of mastery and imagination that were present in my classroom. I am a very lucky teacher!


Jewelry display - Cindy photo

Photo taken by Cindy Wimmer of my Meet and Greet display


Terry G cuff _1024

Terri’s cuff from Day 1, Romancing the Wrist

student work4_1024

Some in-process shots, antiqued and ready to color

Klik leaf2

Kathleen’s photo of her leaf from Day 2, Color Your World

Louise Smith work _1024

Louise’s shimmery take on the cuff workshop

Jennie and Frankie cuffs _1024

Cuffs by Jenny and Frankie

Artbliss Perrie  cuff_edited-1

Perrie’s beautiful cuff


artBLISS - Cindy's piece_opt

Cindy’s layered and colorful pendant

Artbliss Myers cuff_1024

Carol’s cuff with ornate centerpiece

ArtBliss - Larre cuff

Cynthia’s cuff plays off circles and angles


I’m already thinking of ideas for classes for next year! I’m going to continue with the idea of applying surface coloration to polymer since it seems that this resonates with people who have never used clay before but have experience in other jewelry-making and art disciplines or have worked with paints, paper and multi media. If you want to be notified of class topics for next year, convo me at www.storiestheytell.etsy.com. Hope you enjoyed the slideshow!

Friday, July 27, 2012

Change is Good


I’ve been wanting to change my blog header for a while but had been unwilling to put the time into learning the vagaries of digital photo editing with the confusing array of formats, pixels and photoshopping options. But as I approach my 100th post I know it’s time I updated my look to acknowledge the evolution of my artistic style.

Friends Cindy Wimmer and Claire Maunsell came to my rescue. Cindy turned me on to PicMonkey, a very user-friendly and fun program (don’t let yourself get too carried away with features) that has significantly more ability than my very low-level, free Photoshop program. Claire was having issues with Blogger, as was I, and discovered Windows Live Writer—which saved my sanity and my hair (as in the tearing out of) and has made blogging a pleasure once again. Also, Live Writer has a very easy-to-use photo resizer so I can manipulate the images easily.

So now I’ve been playing around on PicMonkey and stored up several other headers so I have them on hand when my next urge to update arrives. 

So your patience with my housekeeping shall be rewarded with some eye candy. Here are several new pairs of earrings I’ve made for the ongoing 52 Pairs of Earrings Flickr group that I belong to. Now that I’ve taken the plunge and updated my blog template, I can also make my photos larger and my surface treatments show up to much better advantage.

DSCN0673_1024

“Molten”


DSCN0743_1024

“Tectonic”

DSCN0715_1024

“Enfolded”

DSCN0766

“Spiral”

DSCN0706_1024 
“Distorted”

DSCN0775_1024

“Amoeba”

Tuesday, July 17, 2012

Second Time Around

When I design a piece, I try to do it in an unhurried way, so that I can consider everything-- design, placement, elements, story-- without the pressure to finish for a deadline. Well, that's the ideal anyway.

Sometimes the ideas just jump into my head and I work furiously on something, without any specific purpose in mind. Experimental ideas, especially. Usually I go to my sketchbook, to get my thoughts down before they dissolve like morning mist. But sometimes (usually) my housework, dishes, chores or whatever take a backseat to the siren song of my Muse.

As most of you know, a lot of my large pieces were a result of my participation in the Art Bead Scene's monthly Challenges, with fine art works as the inspiration for a strung piece using art beads. Some month's selections call very strongly to me, as did the choice for March 2009 by Henri Matisse. This painting as a poster hung on the door of my bathroom after I saw the original at a Matisse show in San Francisco. Oh that orangey-red color! Pure passion and intensity! When I was a child, I wore greens, browns and rust. Who would have thought that these days the color red in all its many forms would be found in almost every room in my home?

ABS Matisse_ Challenge_March 2009

For my first take on this, three years ago, I made up a polymer clay mokume gane blend (a technique from Japanese metalworking where layers of different metals are revealed by drilling and grinding) of orangey-red, dark green, yellow and violet and applied slices to 18mm polymer bead cores. Then I made several lentil beads in different sizes and did the same. These were strung with black and red seedbeads and black coconut shell slices. Overall, it had the modern feel I was seeking to complement the abstract design of the lentil and round beads.

Picture 906_1024

Original “Rainforest” necklace – March 2009

I couldn't bear to sell the piece-- I just loved those red goldfish too much! But my style started changing too and became more complex and layered and I decided to re-do it. On a practical note: don't use coconut shell slices-- they have sharp edges and are uncomfortable to wear around your neck!

I started with the focal, as it didn't seem  large enough or too weak to support the other elements. I added an elaborate black and white textured frame but it was just too much. [The great thing about polymer is that you can continue to add new pieces to the original as long as you haven't coated it with anything that can't take the 275 degree curing temperatures.] I ripped off a lot of that and began to layer on a textured backing and finally had my focal design! Since I used acrylic for the color I could employ my favorite polishing medium—shoepolish-- for a subtle shine.

DSCN0744_1024

Rainforest focal

DSCN0750_1024

Rainforest focal – reverse

Then the fun began-- I really love stringing!-- and I added irregular-shaped natural coral pieces, some Oaxacan clay bird beads, Dalmatian jasper chips, black bean beads, green vintage African glass and metal beads, some small yellow spacers and my mokume gane rounds. The clasp was hand-hammered annealed steel wire, which I also used for the twisty bail ends to attach the focal.

So now my necklace is more complex and interesting, the feel is more tribal and yet still abstractly modern and my homage to Matisse's genius feels like my style, finally. Paired with the bead-stacked mokume ball earrings, I feel the second time around for this necklace is a true victory lap!

DSCN0747_1024

“Rainforest”

DSCN0749_1024

Friday, July 13, 2012

Lessons from Nature

As I sit here this morning looking out over my shimmering summer pasture, listening to chirping birds and cackling hens, it's hard to imagine the violent weather of last summer, known here as Tropical Storm Irene.

Although we thankfully missed the destruction that many Vermonters endured, our lower pasture became a raging torrent of rain-swollen water. The stream bank that was formerly three feet above the surface of the water is now almost level with it. Luckily, this summer has been hot but very benevolent in terms of weather conditions and even allowed us to paint the rear wall of our house—summer painting projects are not always a sure thing in Vermont. The old adage about our seasons-- “nine months of snow and three months of bad sledding” isn't all that far off the mark!

Flint Brook

So we respect the weather here and it's usually the first topic of conversation when meeting others. As farmers, we know that every activity is dependent on the behavior of the natural world. So we respect Nature and learn to read the subtle signs and indications that She provides us every day.

Since last summer I've had a pile of tree roots drying on my front porch from a downed tree that was completely uprooted by Irene. It's caused me to think on how everything in Nature is connected by design. The leafy portion of a tree branches out to gather sunlight and air from its environment, while below the surface, the roots expand into the soil to capture nutrients and water. But think about the human body—our blood system mimics the same design as it courses throughout our bodies, very like the trees in my front yard. From heart to large veins and arteries, down to the smallest capillaries, these tiny streams branch out to the furthest parts of our fingertips, so similar to the branches and roots of a tree.

So this was my inspiration as I began to wrap polymer strands around my fingers into wreaths and rounds of clay, textured and antiqued and colored with pencils and oils. Picture jasper rondelles and pyrite were added to add reflective surfaces to complement the matte quality of the branchy beads. I finished off with beads from a prayer mala-- it seemed fitting, as this piece began as an experiment and ended as a meditation on our natural world.

DSCN0729_1024

DSCN0730_1024

DSCN0731_1024

DSCN0732_1024

DSCN0728_1024

DSCN0733_1024

DSCN0727_1024 “Roots”

DSCN0633_1024

“Twisty” earrings

Wednesday, June 20, 2012

Shipwreck’d

I was never a fan of “Gilligan's Island” but as a child who read everything she could get her hands on, my favorite stories were of the sea, pirates and being shipwrecked-- “Swiss Family Robinson”, “Robinson Crusoe”, “The Black Stallion”, “Treasure Island”. I love that game that goes “who would you most want to be marooned on a desert island with?”

The idea of exploring an unknown island where you might discover anyone or anything has captured the imagination of storytellers for centuries and, given the recent huge popularity of “Lost” on TV, it shows no signs of slowing down. What will we find-- lost treasure, hostile inhabitants, a wormhole into another galaxy? The possibilities are endless.

Summer in the jewelry design community usually brings lots of pieces that reflect our passion for sun and surf. I'm a rocks-and-crashing-waves kind of beach person, not a sun-worshipper-- freckles and red hair don't pair well with Sol's sunny assault when July comes around. But I love beachcombing and tide pools and weird seaweed and beach glass and old metal and stones and shells.

So when I set about finding elements to use with a little experimental focal that Douglas made, my thoughts turned to mermaids and shipwrecks and things that have lain under the sea for eons. I adore the color aquamarine so slices of Impression Jasper from Lima Beads (link) set the color palette this time. I had a random collection of polymer beads that didn't make it into other pieces and had some thematic affinity so I began to fill out the strand with those and picked up the color of carnelian along the way from Douglas' focal.

DSCN0613_1024 

DSCN0612

DSCN0615_1024

DSCN0611_1024

DSCN0614

Following instructions in a MissFickleMedia tutorial, I heavily patinated some bronze African rings and added those to some patinated droplet fringes. Rough carnelian rounds from my favorite Etsy seller in Vermont, One Piece at a Time paired nicely with discs of Roman glass from Happy Mango Beads.

The bracelet to match (sometimes I just have to) is in process but the earrings came together quickly.

DSCN0661_1024

DSCN0618_1024

Picture yourself wearing the necklace and some tiered, white, ethereal gauze creation, walking barefoot along the beach at sunset and looking forward to an intimate dinner with...........who would you most want to be marooned on a desert island with?

DSCN0660_1024

Friday, May 25, 2012

Button, button, who's got the ......?

Cindy Wimmer's Button Blog Hop a few weeks ago really got my button-related creative juices started. My partner in this button love-fest, Celeste Thurston, had sent me a package filled with more buttons than I could use in just one creation. Since I work a lot with the color red, I decided to finish up a piece that I started over two years ago.

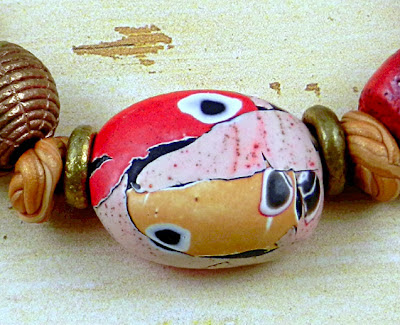
Starting with a polymer clay mokume gane blend of red, green, white, black, pink and cream I covered a quantity of beads with slices from the mokume stack, placing them over a base of red and gold. I had a lot of the mokume blend left over so I amused myself with building a long cylinder bead (4”), intending at some point to wrap it in wire. The resulting beads were reminiscent of gypsy bandannas and I sold several sets on Etsy. Then the leftovers sat in a bag.

Gypsy beads

 About a year ago I found the Gypsy beads again and began building a necklace base, using some red flower-shaped Czech glass beads with Picasso finish-- my favorite!--older twisty gold polymer spacers, early faux coral polymer beads and some experiments with Maggie Maggio's watercolor technique for polymer which I adapted to my own eclectic style.


Watercolor bead

The long cylinder bead proved difficult to position in a design, since it needed to hang vertically in the piece. My idea for the wire wrap evolved into a beaded wire twist, which not only added color to the cylinder but also morphed its shape into something more interesting.


Gypsy cylinder bead

Again, the necklace sat, waiting for .....something.... to motivate me to finish it. Then inspiration struck.

For the Button Challenge I had made a complex polymer base for the Bakelite buckle from Celeste which had Mayan overtones (for me). I decided to made another base to support a red Bakelite bead from my stash and stage two more buttons from Celeste on top-- a Bakelite cream fluted and a red Czech one. But this time I decided to go with a round design to play up the shape of the buttons. I layered and sliced and built and then antiqued the focal in various colors before glueing on the buttons.

While all this was coming together, Douglas was viewing a program called “Ancient Aliens” about the recent discovery of a massive complex of buildings beneath the waters of Lake Titicaca in Bolivia, near an amazing pre-Inca ancient temple site called Tiahuanaco. One of the images made him call me into the living room to look: it was the image of a god with a halo of shapes very similar to my focal!

Tiahuanaca image


Focal

I never turn my back on synchronicity so I looped two large jumprings from a chain purchased at Michael's through some convenient holes in the focal and my long process was completed. I named it “Stone in the Center” to honor the temple site, Tiahuanaca, and the deep and mysterious lake in the Andes Mountains. When modern meets ancient, the two can make some real design drama together.

"Stone in the Center"

Sunday, May 13, 2012

All Buttoned Up!

What do Mayan stone carvings and red Bakelite have in common?

Not much, you would think but lately I've been perusing a book on Alexander Calder's jewelry, a fascinating look into the artistic mind of a genius whose iconic sculptures changed the artistic world of the 20th century. He made wire jewelry as gifts, each one a tiny masterpiece of form and design. So I've been steeping myself in mid-century styles and influences, mostly tribal and primitive.

I was lured away from my new avian buddies – 45 chicks which arrived peeping at my door courtesy of the USPS a few weeks ago --by the promise of new and unknown buttons chosen from a stranger's stash. And of a fun design challenge/Button Blog Hop hosted by my good friend Cindy Wimmer.

I found myself happily paired with Celeste Thurston, whom I met at ArtBliss last year. We chatted about our button collections—where we collect, what we like to collect and what are our favorites to collect--one of the best entertainments of a button swap. We both like to make molds from our buttons to use with polymer clay and neither one of us shies away from “large” so Celeste suggested she send a Bakelite belt buckle in red and amber that she had. I have a fabulous stash of red buttons of varying shapes that I scored at a flea market one summer-- one of the excellent finds of all times-- that I knew contained some red Bakelite I could combine with the buckle.

When the buckle arrived, it was magnificent – large, colorful, shiny-- and square! I'm not a 'square' person-- I don't like angles but I adore curves. How to incorporate this intriguing shape into my design sensibility? I decided to do a polymer clay background, using a technique I stumbled upon while messing around with unconditioned clay one rainy day.


Faux Bakelite Primitive


I liked the freeform way that the holes appeared when the slices were stacked so I did the same thing using ecru clay, building a flat background layer, then stamping and antiquing it. Reminded me of Mayan stonework when I was finished. So I kept the theme going and made some beads using the same technique to pull the whole thing together into the stringing. I raided my bead stash for some leopard skin jasper and found some older beads I had made with the same colorway, added some red crenellated Bakelite beads from the famous Red Button Stash, some bronze African cage rounds and rings from a Michael's chain to hook it all together.

I was planning to add some other red Bakelite shapes to the center front of the buckle and use E6000 to glue the whole thing together. I usually like to use wirework or rivets to join pieces but the smooth modern finish of the buckle seemed to need a minimal treatment. When Douglas got home from work, I proudly displayed my creation and he said “It almost looks like a face, with that center line as the nose”. A face! Perfect! Celeste had included an interesting long Bakelite bead with a gear around the center and that made the ideal nose for my 'little man'. An ochre Bakelite gear button was the base for one eye and coral rounds made up the rest. Very Picasso-like, I thought. “Pablo” was born. Thanks, Cindy for hosting such a fun challenge and thank you, Celeste, for the gift of my wonderful buckle and supporting buttons. Happy Mother's Day!


"Pablo"


Please visit all the other participants' blogs to see what they did with their buttons-- here's the link to Cindy's page (can't seem to load this list!) http://www.sweetbeadstudio.com/.