Thursday, December 22, 2011

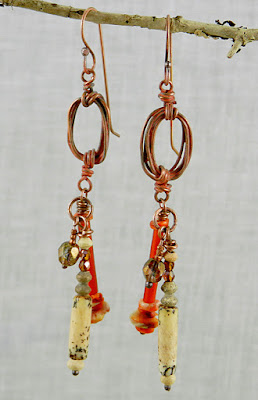
The Twelve Pairs of Earrings

I love to play in my studio. So much so that I have boxes and trays of 'one-offs' that were either little experiments or tryout pieces for something that either never got finished or ended up not needed. Orphans. They're valuable little orphans for they opened my eyes to a new technique or proved I could do something with the clay that I had only envisioned in my sketchbook. But they seem a bit sad this time of year-- they want to evolve, to become a part of something larger.

So to end up 2011 I decided to give them all homes in earring sets. Or at least 12 sets-- it resonates somehow with 'The Twelve Days of Christmas'-- “12 pairs of earrings, 11 lords a'leaping, 10 ladies dancing”, etc. These are going immediately into my Etsy shop or they'll end up being worn by me!

For all of you who are doing some late shopping or just because we all need to gift ourselves sometimes-- for whatever reason-- here are my offerings and please enjoy the eye candy. They're the only sweets this holiday season that won't go right to your hips!

I'm rushing to get these listed in my Etsy shop but if you fancy a particular pair, please convo me at Etsy and I can put a Reserve listing up for you.

And from our house to yours--have yourselves a Merry Little Christmas!

Imaginarium earrings - Available in my Etsy shop

Textured and stacked polymer clay dangles, patinated with acrylic
paint and gilders wax, embellished with frosted resin windows


Poinciana earrings - Available in my Etsy shop

Polymer clay patterned with handmade molds, colored with oil paints and gilders wax - brass earwires


Winter Moon earrings - Available in my Etsy shop

Polymer clay patterned with a mold made from an antique picture frame, colored with alcohol inks, embellished with handforged copper washers patinated with gilders wax - copper earwires


Ulan Bator earrings - Available in my Etsy shop

African glass, coral disks, Ethiopian clay spacers, copper spacers and findings, handmade and patinated links, crystals, tagua nut tubes


Ostia earrings - Available in my Etsy shop

Handmade polymer clay stacked elements with resin centers, patinated with gilders wax, antique Roman glass disks, Greek ceramic spacers, brass spacers and findings


Horn of Africa earrings - Available in my Etsy shop

Handmade and textured polymer clay dangles, antiqued brass beads,
 handmade enamel bead caps by Mairedodd, brass earwires


Telluride earrings - Available in my Etsy shop

Polymer clay formed with a mold made from an antique picture frame and colored with alcohol inks and colored pencil - copper earwires


Edgy Sugarplum earrings - Available in my Etsy shop

Polymer clay textured with a mold from an antique picture frame,
colored with alcohol inks and patinated with gilders wax - silver earwires


Silken Tent earrings - Available in my Etsy shop

Polymer clay disks, rayon fibers, African bronze spacers, bone beads, Ghana daisy spacers, handforged bronze earwires


Heart of Winter earrings - Available in my Etsy shop

Polymer clay hearts from a repousse original, handforged and patinated antique bronze disks, antique star findings, bone spacers, bronze earwires


Carpathia earrings - Available in my Etsy shop

Polymer clay mokume gane technique dangles, repourposed patinated brass embellishments, bronze earwires


Valley of the Kings earrings - Available in my Etsy shop

Polymer clay elements done in the mokume gane technique, handforged and patinated brass washers and dangles, bronze spacers and earwires


Sunday, December 11, 2011

By the Numbers

Numbers have great significance in many cultures. In Western culture, the number “3” philosophically describes the Deity in both Christian and Celtic societies. In Navajo culture, “4” represents Nature's essential elements-- wind, water, air and fire. The discovery of the zero allowed civilization to advance in science and mathematics. Numbers represent our birthdays, wedding days, holidays and significant dates in our world's history.

But as designers, we just love numerals because of their unique graphic appeal. They are like ancient runes, significant because of what they represent but pictorial in their aspect. They are modern hieroglyphics, language and design all together.

I love browsing typeface sites like Dafont.com-- so many cool fonts that drive my imagination wild. I used to work in a graphics department and I've never lost my love for letters. But recently I was invited by the folks at Create Mixed Media, publisher Northlight Books' blog, to create a set of numerals for this week, December 11-17, for the blog which they call "The Week as Art". Seven days' worth of numerals are depicted by a different mixed media artist every week. I decided to make mine in polymer clay and embellish them with lots of texture and color. Here they are in full size.

December 11
Black polymer clay, hand-applied impressed designs, heat-set oil paint


December 12
Bronze polymer clay, hand-applied textures from silicone molds, German Silver gilders wax


December 13
Ivory polymer clay, heat-set oil paint to antique and color


December 14
Polymer clay, hand-applied texture, heat-set oil paints, African Bronze gilders wax


December 15
Polymer clay, faux bark handmade texture sheet, heat-set oil paint


December 16
White polymer clay, commercial texture sheet, heat-set oil paint, Silver gilders wax


December 17
Mokume gane veneer polymer clay - metallic and opaque clays

 If you haven't discovered the Create Mixed Media blog, head over there to check it out. There are lots of informative and interesting posts by both editors and guest editors on wide-ranging topics of interest to anyone interested in jewelry-making and every kind of mixed media, covering everything from art retreats to setting up a home studio or marketing your work. This week on Thursday, December 15, there is a webinar by my friend, Barbara Lewis, author of Torch-Fired Enamel Jewelry. Registration is free but be sure to reserve yourself a place.

Sunday, November 20, 2011

Gilded

I love the paintings of the Pre-Raphaelite school. They were actually considered 'avante-gard' for 1848 in that they rejected the prevailing style and aesthetic and embraced color, romanticism, the morality of the Middle Ages, spirituality and the natural world with enthusiasm and originality. I find their depictions of women are incredibly sensitive and sensual for (mostly) male painters in the mid-19th century.

Their color palette is rich, highly saturated and vivid, even when depicting dark woodland scenes and costumes, as represented in this month's Art Bead Scene's inspiration, the Renaissance-influenced work of Marie Spartali Stillman, called “Madonna Pietra degli Scrovigni”.

Madonna Pietra degli Scrovigni

I was immediately drawn to this painting, but not because of the theme-- as I usually am-- but to the colors-- bronze, sage, russet-- especially the bronze. In mixing this color in polymer clay, gold and black are mixed in equal amounts to create a metallic with great depth and opulence. So I started to create some textured elements that I planned to use to frame molded cabochons in polymer tinted with my other favorite colors from the 'Madonna'. I started with texture sheets and molds that had more naturalistic themes but added  some of my favorite abstract ones to change it up.

I found myself getting rather carried away with these textured frames and once they were cured and antiqued with burnt umber heat-set paint, I was conflicted-- had I strayed too far from the painting in my interpretation? Well, isn't that the point-- to use the work of art as a springboard to some completely new ideas?

My method is to re-do and keep working until I have exactly what I want, even if I have to do it over and over. I did just that in this piece-- the third time was the charm. My first attempt was to cut cabochons to fill the textured frames from very abstract pieces of scrap clay in a colorway from the painting but the result was wrong for the ornate quality of the frame. After I carefully chipped out the cured, glued clay with an X-Acto knife, I tried a mokume gane veneer but it was too busy and distracting. I finally went back to one of my favorite molds, made from a piece of Victorian picture frame that was the basis for my Jane Eyre cuff and recently was reinvented for the current issue of Handcrafted Jewelry magazine as the Shangri-la Cuff tutorial. I centered the cutouts for the cabochons on the leaf motifs, placed the clay slices to cure on an upturned metal palette so they curved and used my heat-set oils and gilders paste to color and gild the cabochons. I liked that they had a porcelain-like look to them. To delineate them from the frames I used some notched scarlet clay as an edging and lightly gilded it.  I used some reproduction Victorian bookchain to hang the elements, completed a set of earrings and I was finally satisfied with the results.

Now I've got a very opulent necklace to wear for the holidays and a new technique to play with. Not a bad investment of my creative time!


"Gilded" - detail

"Gilded" - detail

"Gilded"

"Gilded" - earrings

Friday, November 11, 2011

Wicked

For the past two years I have done a special piece for Hallowe'en, which is also Samhain (saw-wun) in the Celtic/Wiccan calendar. It is believed that on this night the boundary between living and dead souls is very permeable and that we are able to communicate with those who have departed to realms beyond. My research says that since not all spirits were benevolent the Gaelic custom of wearing costumes and masks was an attempt to copy the evil spirits and ward them off, also achieved by hollowing out and carving large turnips with faces and placing them in windows with candles within. I imagined a piece to evoke these “haints” based on Ray Bradbury's classic short story “Something Wicked This Way Comes”.

I had already envisioned a pendant, a sort of tribal design with mini-wings and wire-wrapping but decided to add a face. I've never done faces but I have altered commercial face molds so I started with that. The result was interesting but my little man wasn't at all scary! I had added some pieces of other texture molds to his face and he looked kind of Mayan--not the look I was going for.


My sister was here visiting from Berkeley last week. She had taken a class with the legendary performance artist, Sha Sha Higby, where they made several jewelry-sized masks in some sort of plastic/resin. So we copied them using the RTV mold stuff I love, Alley Goop. Then we made some faces in polymer clay and some in resin. I liked the results but since they weren't my own original designs, I kept going.

Sha Sha Higby molds, done by me in polymer and antiqued

Even before I worked in polymer clay, I had notebooks for my fiber ideas and drawings of outfits and textile techniques. The most potent design trick I know is to revisit my old sketchbooks and mine them for idea gold. And so I found myself searching in them for some pictures I drew of the avenging Morrigu--a triad of goddesses of war and death,  from the Celtic epic poem, the Táin Bó Cúailnge. (It's a fascinating story and there's a very good fictionalization of it by Greg Frost if you're not into heroic poetry).

The Morrigu, from the Táin - from my notebooks, circa 1996

My original idea was to hook a large tapestry rug illuminating scenes from the epic and I had made some sketches in preparation. They were scary and primal and came right out of some dark place in my imagination where humankind holds a terror of avenging spirits. I decided that a face based on these spirits would be perfect for my Something Wicked. After free-sculpting the face in polymer, I painted it with Genesis heat-set oil paints.


Something Wicked This Way Comes - detail


I pulled the face and the base together with some coiled Whim-Z Wire, patinated it and chemically bonded the whole assembly to a long piece of mammoth fossil bone. Now I can stand it up in a corner of the window facing my bench.


Something Wicked This Way Comes

Hope your Hallowe'en wasn't haunted by something this scary-- in terms of evil spirits or calories from too much trick-and-treating!

Monday, October 17, 2011

The Flaming Forest

Every autumn in Vermont, Nature bestows one last spectacular riot of color on those of us priviledged enough to live here-- warm blazes of reds, yellows and oranges to keep in memory and warm us through the long, frigid winter to come--the color of flames, the color of passion, the color of carnelian and amber gemstones. Some of us call it "The Flaming Forest".

Taking my cue from what's around me is one of my tried-and-true methods for putting my senses ahead of my technique. I find if I lose myself in color and texture first, the design will blossom from this pure inspiration and the piece will express my unconscious intentions more fully.

I actually started this necklace back in the summer, after finding some polymer beads in my stash that I had forgotten about, my "Little Bumblebeads". These were based on the “watercolor” technique invented by Maggie Maggio, an artist that has pioneered an amazing color system and method for use with polymer but that can be applied to any medium. Her blog is very enlightening and expands on the color theory outlined in the recent book co-authored with Lindly Haunani, Color Inspirations.

Little Bumblebeads

The watercolor technique beads were a perfect complement to my husband Douglas' repousse leaf pendant, which he made a few years ago. It was languishing forgotten in one of my many boxes of work-to-be-completed until I decided to punch up the copper color with some heat patination. That brought out some beautiful metallic lustres and then I added a twisty wire bail.


I've been experimenting for a while with layering my necklaces, wearing two similar ones together for a more sumptuous look but I make them as separate strands in case I'm wearing something more casual. I recently purchased one of my dear friend Erin Prais-Hintz's beautifully-crafted owl charms, from her recent Simple Truths collection. It's nicely abstract and not too cute--looking more totemic-- more like the true essence of this noble creature. I really didn't have a use for it in mind when I bought it but soon realized that it was a perfect focal for the inner strand of my composition.


Owl from Erin's "Simple Truths" collection


"Wisdom" necklace - inner strand

The outer strand necklace was completed by the addition of Czech glass beads and leaves, larger Bumblebeads, and a magnetic clasp. Color of autumn, color of maples, the Flaming Forest.


The Flaming Forest


Heartwood earrings


Friday, October 7, 2011

Storing Up the Bliss

It's been over a week since I taught my first class at this year's ArtBliss outside of Washington, D.C.

I'm still full of happiness at meeting all my great students and all the wonderful friends I only knew from online conversations and from all the super-positive feedback I've received from everyone at the event.

I work in a home studio in a rural area and the majority of the feedback on my work comes from comments on photos posted on this blog or on Flickr. Hardly anyone sees the pieces up close and personal so it was a real treat to see how people reacted to my display of work at the Meet & Greet. I had brought most of the pieces that I made for my recent article in Belle Armoire Jewelry and I was very gratified by the reactions of the attendees.

As I commented to Cindy Wimmer, a good friend and co-organizer along with Jeanette Blix, it's like storing up sunshine from a fine summer's day. When I think about it--with the cold autumn rain coming down outside my window for a week now-- it's warming and energizing and I can't wait to start planning another class for next year! I'm so curious about how what they've learned will influence what my students do next in their own individual art-- I do so hope that their experience in my class will have some positive effect, some lasting inspiration.

Because that's why you teach-- not to become a millionaire. Organizing and schlepping close to the entire contents of one's studio to a venue is exhausting and teaching an all-day class at peak energy is like running a marathon but I would not ever turn down the opportunity to do it all again.

I only have a few photos of the event to add to this post, as I was so engrossed in what I was doing and making sure I covered all the material that I forgot to have someone take photos! Luckily, one of the ArtBliss staff took a few. I'm planning on contacting all my students soon and asking for some shots of finished or work-in-progress pieces.

When we got to our suite at the hotel, a fabulous bag of goodies was waiting for me-- including an antique stand used by offices to hold those old-fashioned stamp pads with handles. Cindy knows what an inveterate antiques hound I am. Doesn't it have the perfect patina and woodsy style as a holder for my Passion Flower brooch? I think I'll keep this one right on my desk staged just like this!


 I adore antique jars too and this zinc-top one is full of shells that Cindy's boys picked up on one of their last days at the beach this year. I'm thinking that each and every one of these was specially chosen by one of them and imbued with their happiness and wonder. What a very special memento, with its tag “Near the Sea we forget to Count the Days”!


And to accompany it was a big, fabulously-illustrated book on shells. I can't wait to delve into this one and create some new patterns in my clay work.


 One of the reasons that I teach is that I come home filled with new ideas and enthusiasm for my medium, polymer clay. I am so blessed to be able to pass that on to others but an equally special reward is that they re-inspire me. One of my students gave me some wallpaper squares that she brought to class. Thanks, Judy, and here are some little samplers I made with the textures. I used Genesis heat-set oil paint for the black base and highlighted the designs with silver gilders paste. Some of these may end up as bases for owl or dragon eyes for my porch pumpkins this year. Students also let me make copies of some of the mold-making originals that they brought to class.


 Finally, a few class pictures. If you go to the ArtBliss site and the instructors list, you can see other shots on their blogs. It's not as good as being there but maybe it will get you thinking about attending next year and joining the fun that we all had-- being together, talking about mixed media for three days and hanging out with good friends. It doesn't get any better than that!


 Gigantic thanks to Cindy and Jeanette for a well-run, energizing, and totally enjoyable event! I felt very taken-care-of by both of you-- you thought of everything! And special thanks to my students for being courageous, inquisitive, energetic, affirming and completely wonderful!


Saturday, September 17, 2011

Life is Just a Bowl of Soup-- Bead Soup, That Is!

The Bead Soup Blog Party is a large collaboration project, brainchild of Lori Anderson, for lovers of beads in which each beader is paired up with another and tasked with sending the following: a focal, a special clasp (not just a lobster claw) and some coordinating spacers or beads.

Using the focal and the clasp is mandatory, but anything from your own stash can be used to round out the rest and you can choose to use the coordinating beads or not.

In my opinion, the real challenge is to make something in your own style using someone else's interpretation, expressed by the style of the components of the Bead Soup that they send you. My partner was Cynthia Deis, jewelry designer and owner of Ornamentea. The focal she sent was a beautifully-crafted lampwork bead with a tree theme by Lisa Daly, the clasp was a handmade by Cynthia, and the accompanying beads were small Elaine Ray ceramic forms and beads and some Czech glass leaves and faceted rounds.

Now my style is more tribal and usually incorporates large elements. My beads have a soft sheen and are not shiny. Gone are the days of Flecto Varathane for me! But lampwork is shiny and glimmery, so how to incorporate it into my own style? I had to solve the same issue in my previous BSBP piece, Mistress Boleyn's Necklace, so after some musing, I came up with gilt! In the tease post I did for this year's BSBP, I showed a piece of polymer done in multiple gilded colors to mimic a wooden Indonesian screen. I decided to use the same technique to frame the lampwork focal so its jewel-like glow was set off and enhanced by metallic paint.

Since the theme of the focal was a tree, I decided to use woodgrain and branches as a background for the polymer “bezel”. Lately I've been influenced yet again by an HBO production-- The Game of Thrones-- in which gardens dedicated to the old gods are planted with trees called “weirwoods”, so I used handcarved branches on a woodgrain textured background to hold the focal and provide a surface for texture, color and gilt. The same technique used for the layered bezel also created the three-strand connectors that hold the beaded wires.

Now, how to incorporate all the small beads into the design? I've been using wire-wrapping a lot lately so the solution was to wrap and string them around forged strands of heat-patinated copper. I drew the patterns onto paper, enlarged them on a copier and used them as templates as I worked. They were then attached to the focal piece with polymer, textured and cured in place. The amazing thing about polymer clay is that it can be cured again and again without harm so layers can be built up and wires can be held in place.

After adding layer upon layer of color with heat-set oil paint, acrylics and gilders paste--a technique I'll be teaching in a workshop at ArtBliss in D.C. next weekend--I decided that simple bookchain links in copper and steel would be appropriate to match Cynthia's clasp and finish off my gorget. (def: a metal collar designed to protect the throat, later used as an ornamental accessory on military uniforms).

As I've said before, I believe that perseverance is the key to compelling design – to keep working into it, adding layers of color, shape and texture. I design with the intent that when people see my pieces, they are inspired to invent a story about them. With “Norweigan Wood”-- my title for this piece-- I hope I've achieved my goal.

"Norweigan Wood"

Focal lampwork bead

Clasp detail

Here's the link for the entire list of 362 participants/partners of the Bead Soup Blog Party. Grab a cup of coffee and have fun-- there's lots of great design to enjoy! And thanks for visiting!

Saturday, September 10, 2011

Bridge Over Troubled Waters

If you were on high ground in Vermont two weeks ago watching as Tropical Storm Irene sent sheets of rain down for twelve hours, except for a fairly warm drenching there wasn't much happening. All the battening down of lawn furniture and picnic table umbrellas proved unnecessary since the predicted Category 2 winds never developed. Of course the power went out about four hours into the storm for four days but we were prepared for that. We had water, oil lamps, crank-up radios, food and plenty to read as we hunkered down in our one-story workshop situated in our field and out of the way of tall trees.

The stream next to our house


Overruning the opposite bank

 As the rainfall rate started to crank up, my husband and I went outside to get a better view of the teensy stream that runs at the back of our acreage, which was cresting its banks with leaping waves and had begun to flood the lower parts of the property. Happily, it had avoided our newly-planted apple grove and blueberry bushes. A wide, shallow river of muddy water was rushing toward a confluence with the larger stream whose course runs a few feet from our driveway, flowing from the hills across the road, under a small bridge and down to the Third Branch of the White River. When I bought this house in 1994, I made sure it wasn't in a flood plain but I also guessed that once the water flowed under the little bridge it had a wider place to go and therefore wouldn't rise to the top of our bank, 12 feet or so above the streambed. My gamble was correct and although Douglas snapped photos of the water's crest coming to within a foot or so of the roadbed of the bridge, severe damage was avoided except for a total rearrangement of the stream's course as well as some physical features of the landscape downstream. I also knew that our home, which is post-and-beam construction and built in 1830, had withstood the historic Vermont Flood of 1927. It had, in fact, sheltered men from the community who stayed here overnight so they could keep one bridge open off Braintree Hill by fending off large trees that were washing down the streambeds and threatening to demolish the bridge.
Floodwaters flowing under our bridge

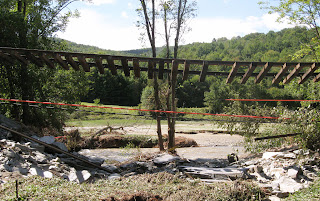
We had experienced major flooding from a summer storm in 1998 and lots of roads in our nearest town, Randolph, were severely damaged that year. Earlier this spring, major work was done to replace aging culverts and this work was well-justified, as those previously-damaged areas came through with flying colors. The Amtrak trestles didn't do so well. In two sites the track was seen suspended in mid-air with nothing underneath for 20 feet.

Amtrak "suspension" bridge a mile from our home

 Monday after the storm we ventured into town to get a cell-phone signal so we could call relatives and let them know we were ok. We began to see saturated furniture and household goods piled in front of homes and farms. Boulders and large trees were left in the middle of flattened hayfields, like strange sculptural installations. Stands of ripe corn were covered with gray mud. Parking lots had collapsed into streambeds, giant bites taken out of the asphalt. Stores had their doors open but without lights. We checked our local Aubuchon's Hardware and they told us generators were on the way. Shaw's Supermarket was running on generators but the shelves were still reasonably stocked. Randolph Village, which had been so hard hit in the Flood of '27, had survived the worst. At least our floodwaters had receded.

View from the bottom of our field-- normal streambed is to far right of photo

Battles Brook heading toward its meeting with Flint Brook
But many of our tiny villages and communities are still isolated and without power or a way to get out except by foot almost two weeks later. My husband's company had watermarks 5 feet up and mud all over their offices and manufacturing facilities. They will rebuild but it will take months and lots of physical labor and help from a backhoe. It's hard to believe that in 2011 our civilized world could be dealt such a blow from the forces of wind and water. You read about the tornados and the earthquakes and the tsunami but until the water's at your door, it doesn't seem real. We are lucky in Vermont that we still have some time to fix roads and find shelter for those whose homes were demolished before winter and the inevitable cold arrives. But the courage and fortitude (a word hardly used anymore) of my neighbors in dealing with this crisis makes me proud to be part of this community-- we're not whining, we're not looting, we are being generous with our resources and our homes, we are rebuilding by using our own hard work and hands, we are helping each other. In earlier times we did the same. It seems adversity serves to renew our trust in each other and our interdependence as a community.